红烧肉 Mom’s Shanghai Style Red-Braised Pork Belly
UPDATED on 3/17/2021 – I am updating this because the recipe that was here has been updated in my debut cookbook, My Shanghai. I’ll leave most of the text.
This dish is a legend in the Liu family. It’s one of those dishes that you know is probably unhealthy and bad for you (just look at that fatty layer!), but you still have to eat because that part is unfortunately what makes this dish so good. You could probably substitute pork butt or pork shoulder, but I’m going to be honest with you – you’re not going to get the signature texture of the dish.
I’ve served this at dinner parties with great success. I always find that this is a great dish to introduce Chinese cuisine (more specifically, home-style Shanghai) to those who’ve only eaten Chinese takeout. This recipe actually has a cute little story. One of our friends was going over to his female friend’s place so they could cook together on Valentine’s day. I gave him this recipe. He trekked through a blizzard to locate pork belly and star anise. Two single people, bonding over great cooking skills (her desserts are killer). And now they’re a couple!!! He dropped a note to me about how this is one dish he’ll never forget. Isn’t that so sweet?!!! I’m not really sure if their getting together actually had anything to do with this dish – let’s be honest, probably not – but let me romanticize this okay?
 This is an important part of the process: caramelizing the pork belly. This step ensures that your pork belly won’t be rubbery and instead melt in your mouth like ice cream. Those who’ve had this will know what I’m talking about. It might seem scary when you first slide the pork belly into the heated wok and oil/sugar mixture. Just step back, use a lid or splatter shield, and turn on the fan.
Troubleshooting + Notes
- If your pork is still too tough, or the color isn’t quite right, you can stop simmering and start heating up a new, clean skillet. Place the pork bellies on the heated skillet, with no oil, and dry-fry until browned on each side. This will help soften the pork belly fat and add to the flavor. You can also then add in 1 tbsp dark soy sauce + 1 tbsp brown sugar and fry it some more. Then put it back into the braise and continue as planned.
- This is a very forgiving recipe. If it’s too salty or too sweet, just add more soy sauce or sugar to compensate. In true Chinese cooking way, simply taste the sauce as it finishes the simmer.
- Some recipes call for adding cornstarch, but I’m gong to tell you straight-up: authentic recipes do not call for any cornstarch to thicken the sauce. It is thickened by cooking the sauce, uncovered, at the end on high. It’s easy to cook off too much of it, so keep an eye on the consistency of the sauce. It should be thick, glistening, and will easily cover the pork belly.
- Don’t add the tofu knots in too early, otherwise they may overcook.
- Dark soy sauce is mostly for the color, light soy sauce gives it the flavor. If you had to use only one, I would use light soy sauce for the flavor.
- Traditionally, rock sugar is used, but I used brown sugar in the first step because I love the extra caramel-ness it adds. Any extra sugar added I do use rock sugar, as it helps with the texture and viscosity of the sauce.
RECIPE: 红烧肉 Mom’s Shanghai Style Red-Braised Pork Belly – updated 3/17/21, recipe
From the book MY SHANGHAI by Betty Liu. Copyright © 2021 by Betty Liu. Published by Harper Design, an imprint of HarperCollins Publishers. Reprinted by permission.
Ingredients
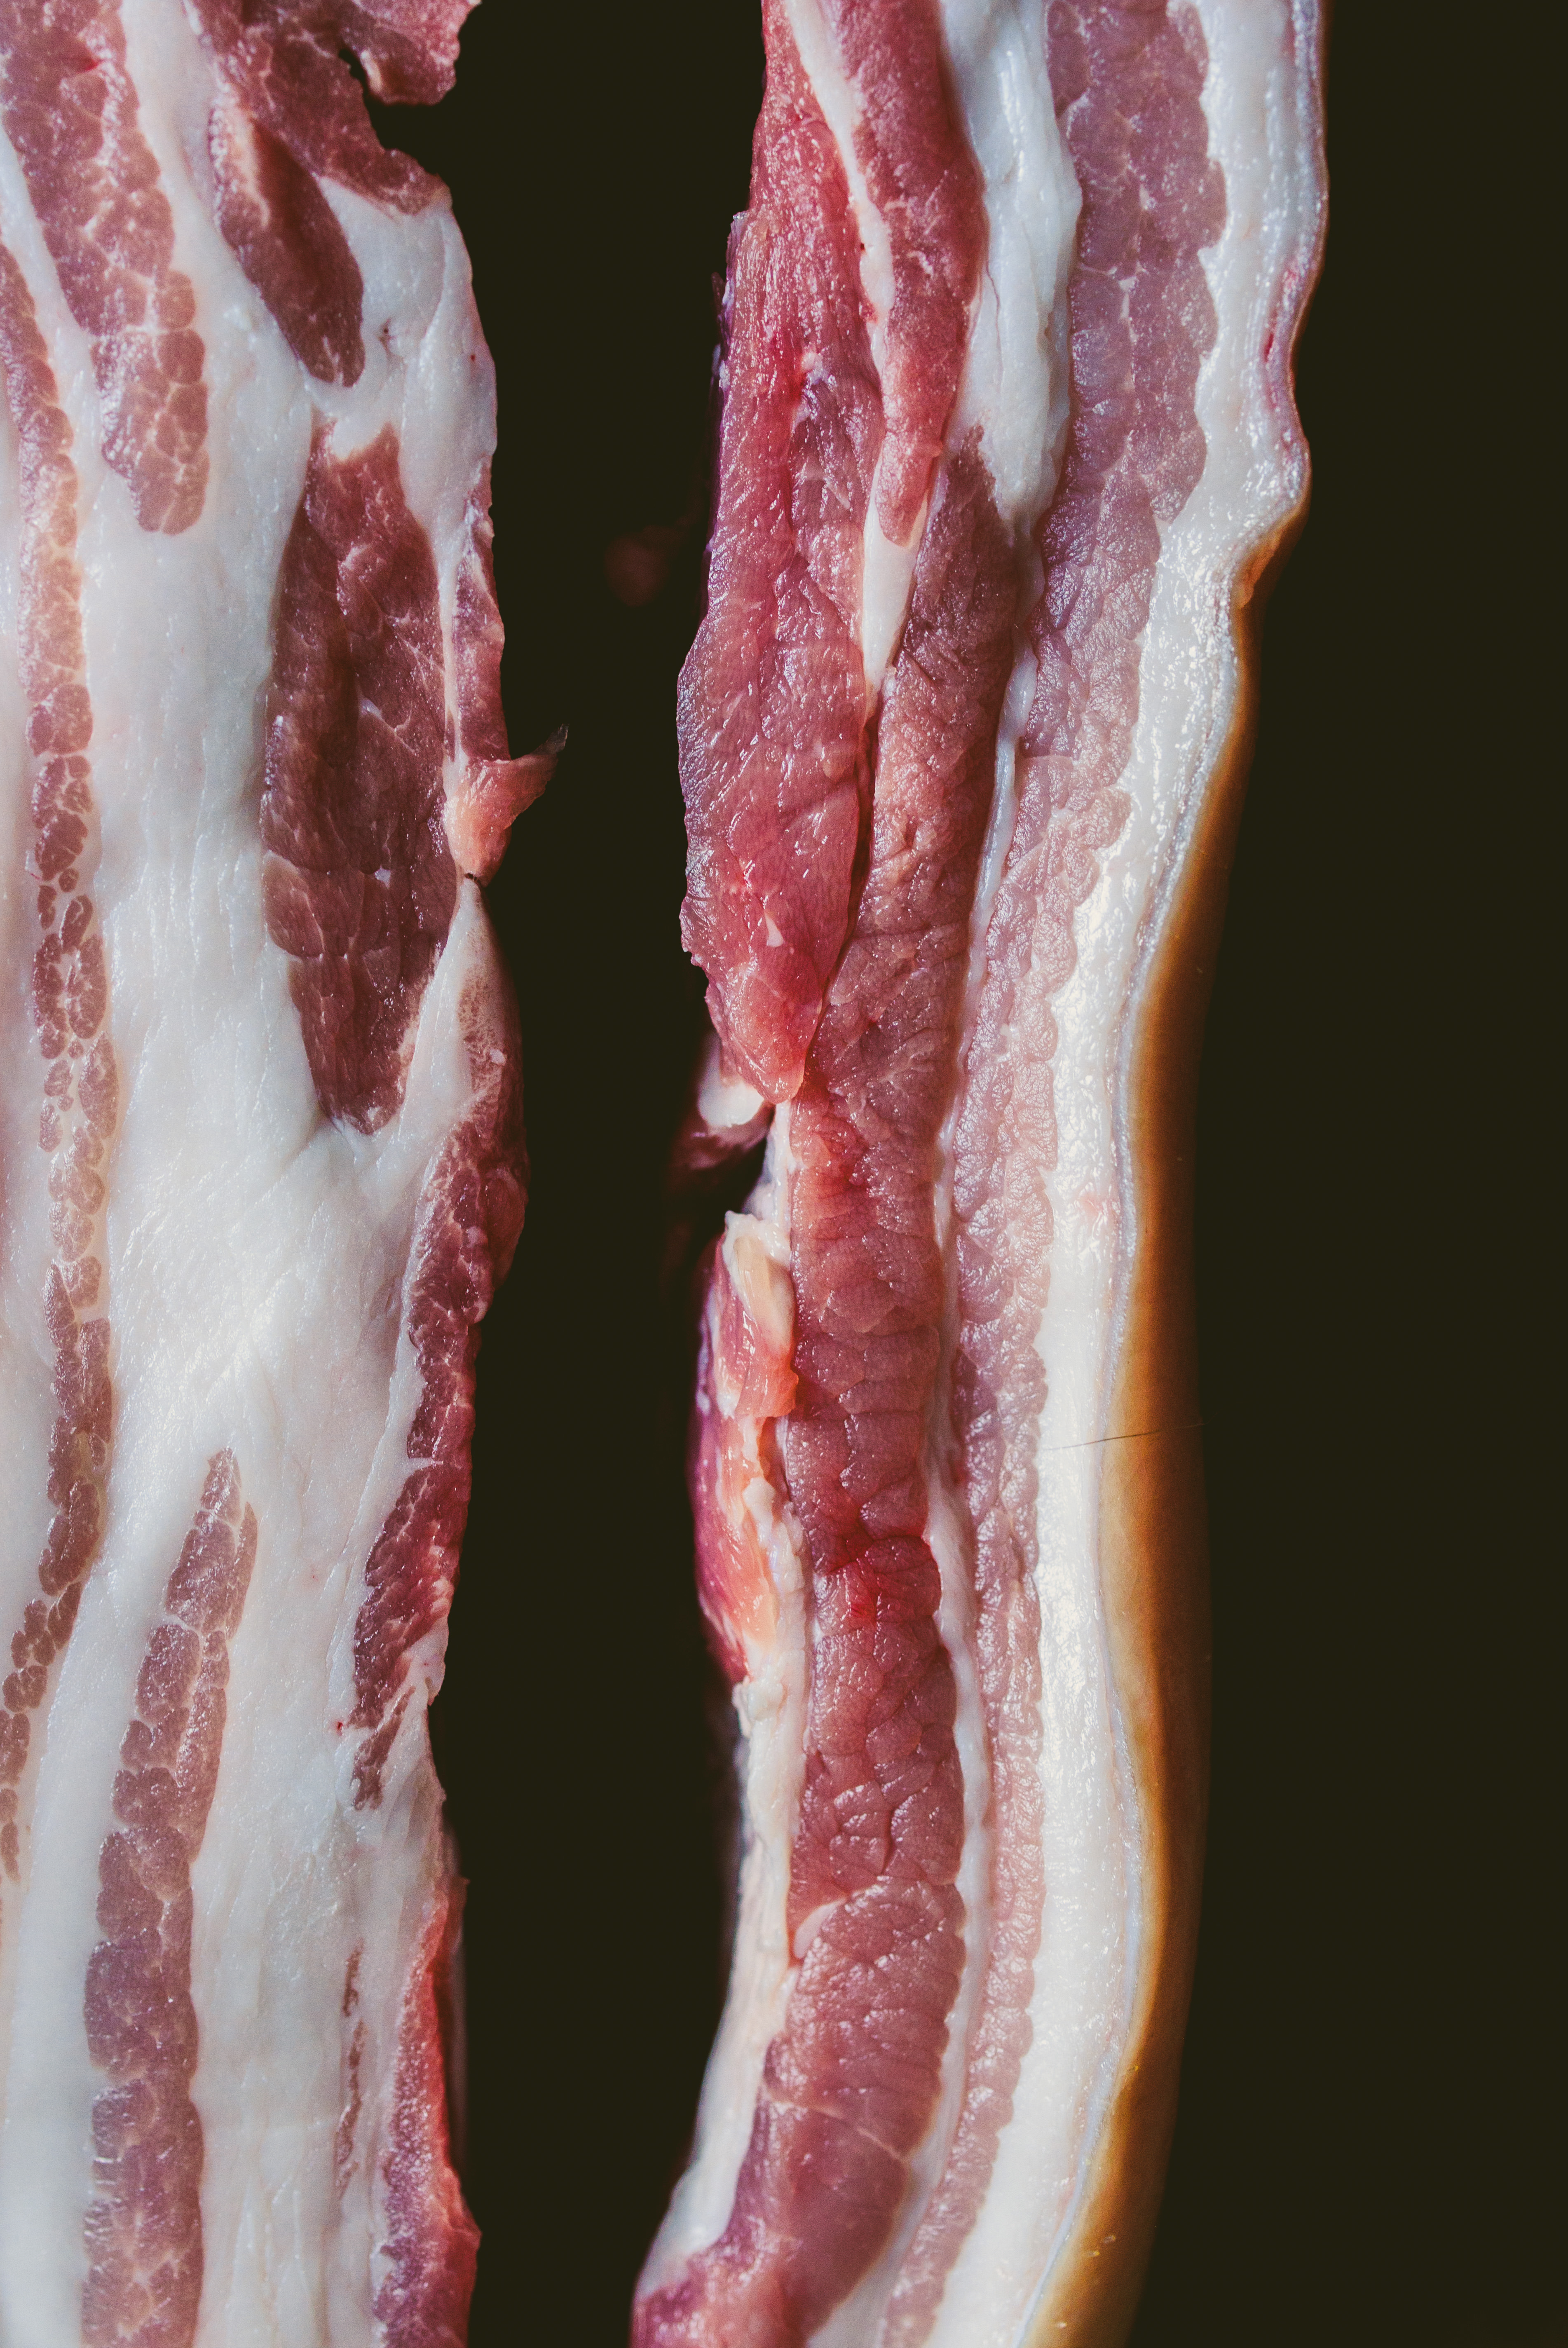
1.5 pounds (680g) boneless pork belly (五花肉)
2 tablespoons neutral cooking oil
4 tablespoons (60g) rock sugar – 2 tablespoons finely crushed with a mortar and pestle, 2 tablespoons left whole
3 tablespoons dark soy sauce
1 cup chicken stock or water
1/4 cup light soy sauce
1/4 cup Shaoxing cooking wine
3 whole star anise
2 thin slices peeled fresh ginger
4 scallions, 3 cut into 2-inch segments, one chopped
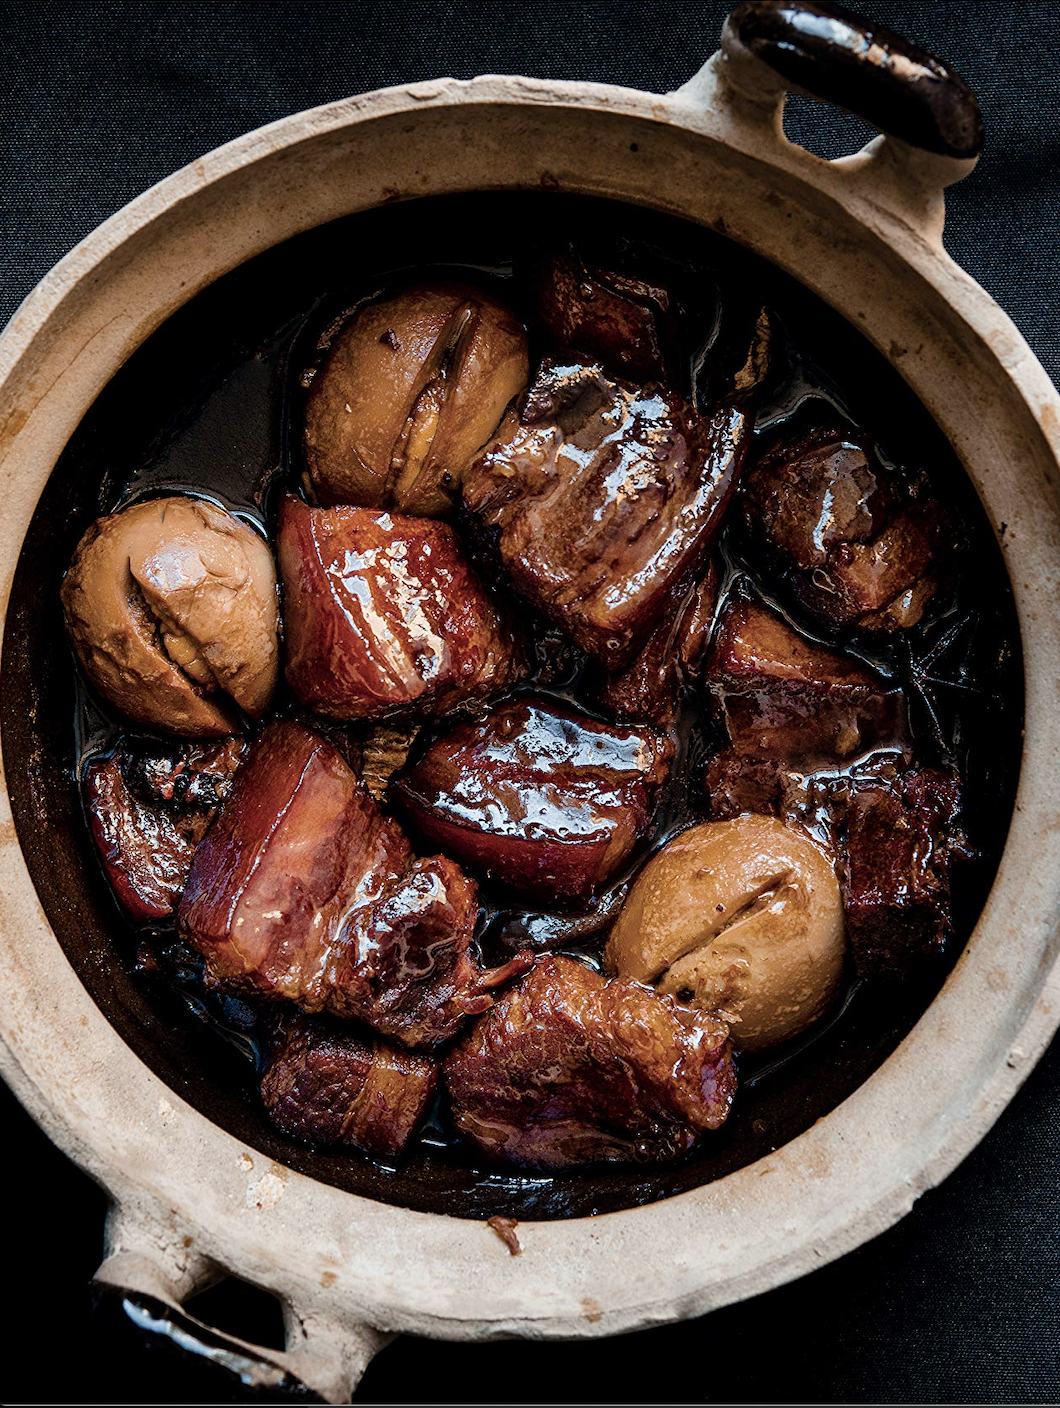
cooked white rice, for servingoptional: tofu knots, hard-boiled eggs
1. Bring about 2 inches (5 cm) of water to a boil over high in a large pot. Add the pork belly and boil for 3 minutes. Add more water to cover the pork if necessary. This step removes impurities from the pork, making for a clearer dish. Drain and set aside. When cool enough to handle, cut the pork into 11⁄2-inch (4-cm) cubes.
2. Heat the oil in a well-seasoned wok on low, until wisps of smoke curl up off the edges. Add the crushed rock sugar and stir until the sugar melts and dissolves.
3. Increase the heat to medium and, working in two batches if neces- sary, gently slide in the chunks of pork belly. Brown all sides of the pork. Any residual water on the pork will pop in the oil—don’t be scared! A splatter screen can help keep the oil contained. Stir only occasionally, so that the pork can caramelize and brown. This step gives it a rich caramel flavor. Add the dark soy sauce and fry for an additional minute.
4. In the wok or in a separate Dutch oven (a clay pot works well for this), combine the browned pork with the stock, light soy sauce, Shaoxing wine, remaining rock sugar, star anise, ginger, and scallion segments. The mixture should come three- quarters of the way up the side of the pile of pork. If not, add more stock or water.
5. Bring to a boil over high, then reduce the heat to the lowest setting and simmer, partially covered, for at least 3 hours, stirring occa- sionally to prevent sticking. The longer the pork simmers, the more tender and flavorful it will be; it’s ready when it’s soft enough to slip a chopstick in with ease, but you can go up to 2 hours longer to build the flavor even more. Add more stock or water as needed; the wok should never be dry. When there’s approximately 2 hours of braising time left, add the hard-boiled eggs to the wok, if using. Twenty minutes before you’re ready to serve, add the frozen tofu knots, if using.
6. When nearly ready to serve, remove the lid, increase the heat to high, and boil until the cooking liquid becomes a thick, dark, glistening sauce that covers the pork belly. If the pork belly has begun to break down (the lean meat is separating from the fatty portion), use a slotted spoon to remove the cubes before cooking down the sauce, and add the cubes of meat back in at the end.
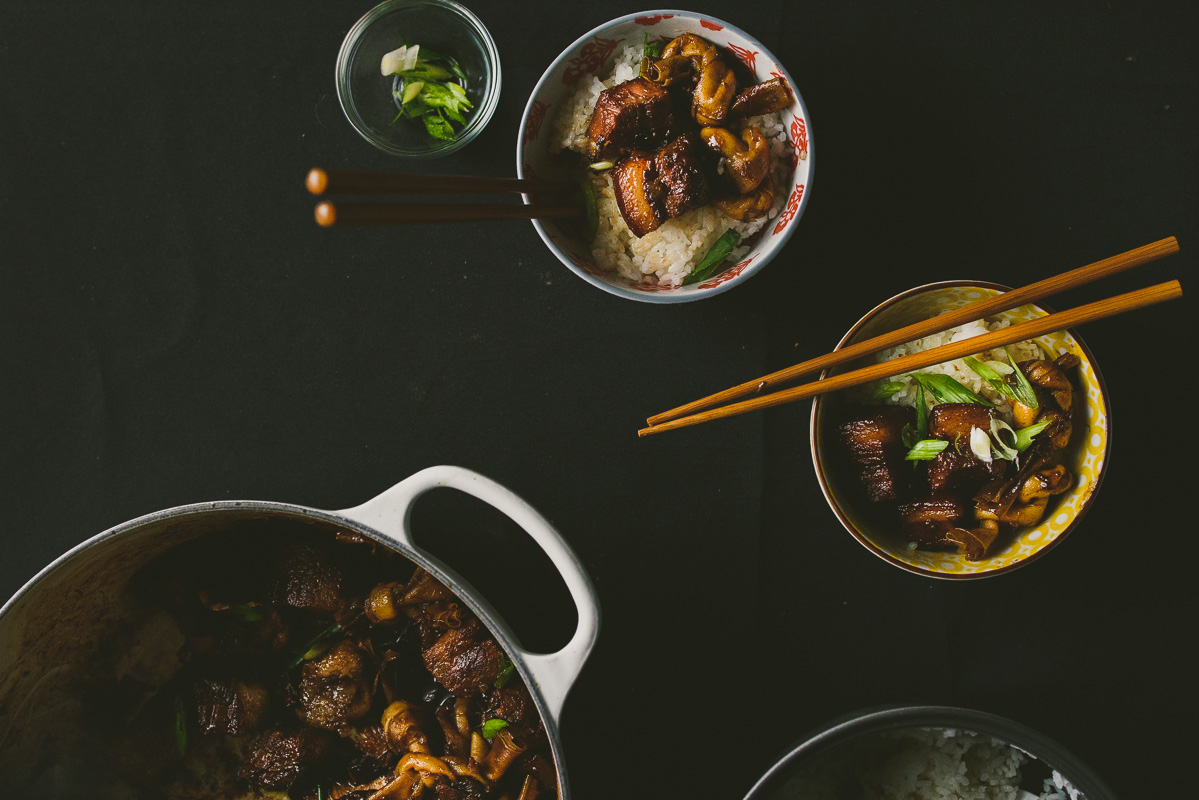
7. Serve with white rice and the chopped scallions.
Yum! Asian-style braised pork belly dishes are one of my favorite types of foods. Thanks for sharing this recipe! I also am much appreciative of your tips — avoiding a rubbery pork belly is essential. So is eating this with white rice 🙂
Thanks Michelle! I can’t count the number of times I called home to troubleshoot with my mom, and I’ve found that these tips cover anything I can think of! <3.
I had an honor of trying this recipe before it was even published. Yes! I’ve got some serious special connections! 😉 And let me tell you, this dish is absolutely unbelievable! Follow Betty’s instructions to a word and you will get some magic on your plate for dinner.
I was a bit nervous about trying it at first, but I was pleasantly surprised to have realized that it was much easier to make than I anticipated. So, do not let a pot of hot hissing oil intimidate you! 🙂 Be brave. Be bold. Take a chance and impress you family (and yourself) with some heavenly tasting pork bellies!
Thank you so much Elena <3. I love that you loved the recipe!!!!!
yes yes yes to the white rice. omg. i love white rice SO much.
also, i can’t wait to see your new about page 🙂
Right? You can’t omit white rice for this. <3. I'm a bit nervous to put my face on the blog.. but got to start somewhere, right?
You deserve a million thank you’s for sharing this one! This is where I’m turning to for my first go at pork belly 🙂
😀
Betty, your blog is lovely, and you, as a person, are even more so! I’m really glad I got to meet you back in college, even if it was for a brief time. Knowing how sweet and warm you are makes me treasure your blog with sincerity. No matter when or what you choose to do with your culinary diary, I will be cheering for you and following your adventures along the way ^^. Say “hi” to the Alex and Annie for me (and a tummy rub too!)~
Aww Wendy!!! Thank you so much – you are making me blush like crazy. I really enjoyed meeting you too and I wish we would’ve had more time to hang out! if you’re ever in Boston give me a call :).
PS. Still waiting for YOUR food blog!
I’m giving up on that food blog for now, maybe I’ll pick it up after I settle down ^^’ but I’ll live vicariously by enjoying all your posts!! <3
P.S. I’m making this next month for sure :D!
Betty!!! I wanna read little facts about you!! haha 😛 (not a stalker I swear). I love this dish!
LOL <3 Mabel your comments are always the sweetest <3 <3
I love hongshao rou! I never knew why sometimes it came out perfectly fall-apart tender and other times it was weirdly rubbery – now I know, it’s because I definitely over-simmered it. The recipe looks beautiful – can’t wait to finally make successful hongshao rou 🙂
Ahaha yeah!! I know what you mean. I feel like we’ve all had those instances 🙂
Wow this is how i love to eat. Oh what a beautiful love story! And what gorgeous photos! I hear you about blog goals. I have no idea what a media kit is. I did just get my own domain finally, but not to monetize, just so I could make it as pretty as I want it to be. I like the idea of having my own little space. Glad you’re doing well! Your blog is beautiful.
Thank you Amanda!! yes – having your own little space is what’s most important. I think doing it for yourself is the most important part, especially to keep it fun 🙂
Gasp. I need to maaaaake this, girl! I’ve always been fond of the “most original version” of an ethnic dish that I can get my hands on, and Chinese is one of those that I’ve had original here and there but nothing to the extent of feeling like I KNOW IT. I’d love to try it more actually, and this awesome recipe is quite inspiring. Also–I love the sincerity in this post! I think you have amazing lookin’ recipes (I haven’t tried them yet), gorgeous photography that does entice my taste buds, and great writing that’s straight to the point. Keep up the great work and I am so glad to be connecting with you even if it’s through the computer screen 😀 <33
Elli I’m soo happy I connected with you too <3. I absolutely love browsing your blog and following you on instagram. I am constantly inspired by the talented folks around me, so thank you for keeping me going :).
you may be a little insecure about your photography sometimes (and what blogger isn’t?) but i thought you should know, your pictures are gorgeous! so dark and moody, and the perfect complement to your recipes.
Chaya, thank you so much! I’m blushing – I feel like I’m still playing around with food photography, finding my style, props, etc… but it’s definitely a fun process!
Hi Betty!!! Gorgeous blog and recipes!! this is one of my favourite things to eat (if I allow myself to) and you nailed it!
Oh HI Mandy!!I was JUST posting a new recipe and was in the process of linking to your xi an hand smashed noodles when I saw your comment!! 🙂 Thank you for visiting <3.
Thank you for the recipe! I’m making it right now, but have a few questions (obviously won’t be answered in time, but for next time!). How much garlic? I used 2 cloves, but it wasn’t listed in the ingredient list. I’m pretty sure I messed up this step, but after caramelizing the pork and adding dark soy sauce. Was I supposed to drain the oil/fat from caramelizing and use a new pot?
Thanks so much!
Betty
Emailed 🙂
Hi Betty! I would love to make this. Can you let me know the answer too?
Hi!!! What was your question? I couldn’t find it in the previous comments. Feel free to email me directly too!
The braised pork Belly recipe, can I cook the day before and reheat it next day for party ?
Yup, just heat it up again and add more water if necessary.
this looks so amazing. I love pork belly, and am so happy to have found an authentic recipe! Would this also work in steamed pork buns? Those are my favorite!!!
http://madelinemarieblog.com/
YES. I do it constantly!
How much garlic should we add? It’s mentioned in the instructions but not in the ingredient list.
Thanks! Edited directions and emailed 🙂
Made this last night. I didn’t include the tofu knots, I chose to use just water instead of chicken stock, and yes to the optional garlic.
Mom said she had only had it this good once before, so anyway, she’s a big fan.
It was a big hit all around.
I made this, cooked it for 2 hours and let it cool down so it absorbs flavours – the meat and fat was really tender, but the skin was tough and chewy – it was acceptable while hot, but became really tough at room temperature – should I simmer it longer – I also browned the meat before braising
Hi Chrissy! I’m so sorry that happened – yes I would recommend just simmering it longer. If I have time I would let it simmer for even 3-4 hours, and that will for sure get you a really soft, melty skin!
Thank you so much for this recipe! I cannot wait to get started on it 🙂
Thanks for the receipe. I had never made this dish before, thinking it was too complicated. Then pork belly went on sale for $1.25 a pound. I bought it without knowing what to cook. And I just happened to have bought some Shanghai Bok Choi so I looked online and kept finding westernized recipes. Luckily I stumbled onto this webpage. Totally authentic! The finished sauce was a little too sweet for me, so I poured out some sauce and added in two tbsp of vinegar in the pot to balance it out and also to help tenderize the meat. Came out perfectly. When the pork was done I layered the bok choi on top and simmered for another 20 minutes. With so much fat on the meat it’s good to have some veggies to balance it out. Yes I completely agreed that white rice is the way to go. With so much fat you need the white rice to soak it up.
~WOW Betty
What an awesome website you have. Your photos are simply outstanding. The layout, the font, all wonderful!
I came across your site yesterday as I was looking for an Hong Shao Rou recipe. I’ve followed your recipe to the T with a few additions of a cinnamon stick, dried chillies, cloves, fennel seeds and black peppercorns.
The pot is on the stove as I write this message…
Love your site, it’s been added to my favourites.
Ronnie
Is there a link to PRINT this recipe?
Dear Betty;
Thanks so much for the recipe and the sumptuous pictures. I was curious whether you were aware of the customary prohibition against sticking chopsticks upright in a bowl of rice, as in your photos here. In China and Taiwan it is thought to resemble incense commemorating the dead, and avoided at mealtimes. Was that not something you learned, was it something your family decided not to emphasize, or have you opted for a deliberate choice of aesthetic over custom?
I ask not out of any sense of ritual propriety, but rather curiosity about how food customs translate and transmit over time and place.
BTW, I’ll be using your recipe for Christmas lunch this year. Looking forward to it!
Hi! I just had to say thank you for this recipe, it’s such a massive hit in my house, I cook it a LOT. It’s just so delicious. I love serving it with pak choi.
Thanks again for posting 🙂
Thanks for this recipe. I’m making it now and can’t wait to try it. One thing I was was a bit puzzled about… should the oil and dark soy sauce be added along with the pork into the stock and other ingredients?
Thank you so much for this recipe! Yesterday was my husband’s birthday. We are German and lived in China for a few years and the braised pork belly was his favorite dish then. I had been looking for it’s recipe, tried many but they never mentioned the hot water and glazing in sugar so I always failed in cooking it nicely….But yours worked wonderfully and he was so happy (and our kids, too!. Thank you so much for sharing!
Thank you so much for this recipe! My mum is from Shanghai and used to make this a lot while I was growing up (in Australia). I’m living in Japan now and was missing this dish so much. It turned out even better than I expected and I’ve been coming back to this recipe and making it regularly since I discovered it. My husband loves it too. This dish always makes us happy and reminds me of home.
Just like yours, my mom was born and raised in Shanghai, too. She used to make this dish – it was my father’s favorite alongside giant head-on prawns. Alas, they are not around anymore but my sons and grandchildren (and daughters-in-laws and friends) love this dish and I cook it for special occasions – like tomorrow, Christmas Eve. In fact I’ve lived in Tokyo, Hong Kong, Paris, Monte-Carlo and Boston so I have cooked this for Christmas Eve all over the world and for half a century! 😉
I pre-ordered your book coming out in March 2021! Love both your writing and photographic style. Can’t wait!!!
Hi Betty
I have used this recipe for a few years now and always come back to it as it’s so great. I’m so happy you have a book! I will definitely be getting it so I can try more of your wonderful recipes!
Hello! I was able to have sworn I’ve gone to this
website before but after reading through several of the post I realized it’s a new comer
to me. Anyways, I’m definitely happy I found it and I’ll be bookmarking and checking back frequently!
Made this last night, still thinking about it this morning. Delicious – thank you! I’m teaching myself how to cook authentic Asian dishes, learning to use the wok with more skill. I sliced the pork belly a little thinner to shorten cooking time. This use of the rock sugar was new to me, happened to have some on hand from my local Ocean Pacific market, for use in tea and coffee. The caramelization it adds is key to this delicious dish. Served with fresh cucumber and mustard seed, garlic and ginger napa cabbage.